Sparky - Robot Companion
Monday Section
ECE 5725 Final Project
By: John Ly (jtl22) and Carlos Gutierrez (cag334)
Demonstration Video
Project Objective:
The goal for our ECE 5725: Design with Embedded Operating Systems final project was to create a smart mobile robot which uniquely combined OpenCV facial recognition alongside voice commands to create a fun robot capable of identifying faces and traveling to them upon voice requests.
Introduction
Our final project is named Sparky. Sparky is an intelligent pet-like robot which listens to its owner and is able to accomplish unique tricks in some ways similar to a real live trained dog. The basis for this project is the Raspberry Pi 4 system combined with a piTFT display, a Raspberry Pi Camera, a microphone, and a motorized chassis. Using both OpenCV and the Python face_recognition library, we are able to display on-screen video feedback of our camera signal with additional image processing to detect faces. A connected microphone allows Sparky to actively record sounds and listen for key words to act upon before doing a desired action, to do so Sparky uses the picovoice library along with custom created files using picovoice console . Lastly, the Raspberry Pi 4 is seated up above an acrylic frame in addition to a rechargeable battery pack, 4 AA batteries for our two DC motors, the motor controller, and our two wheels for locomotion.

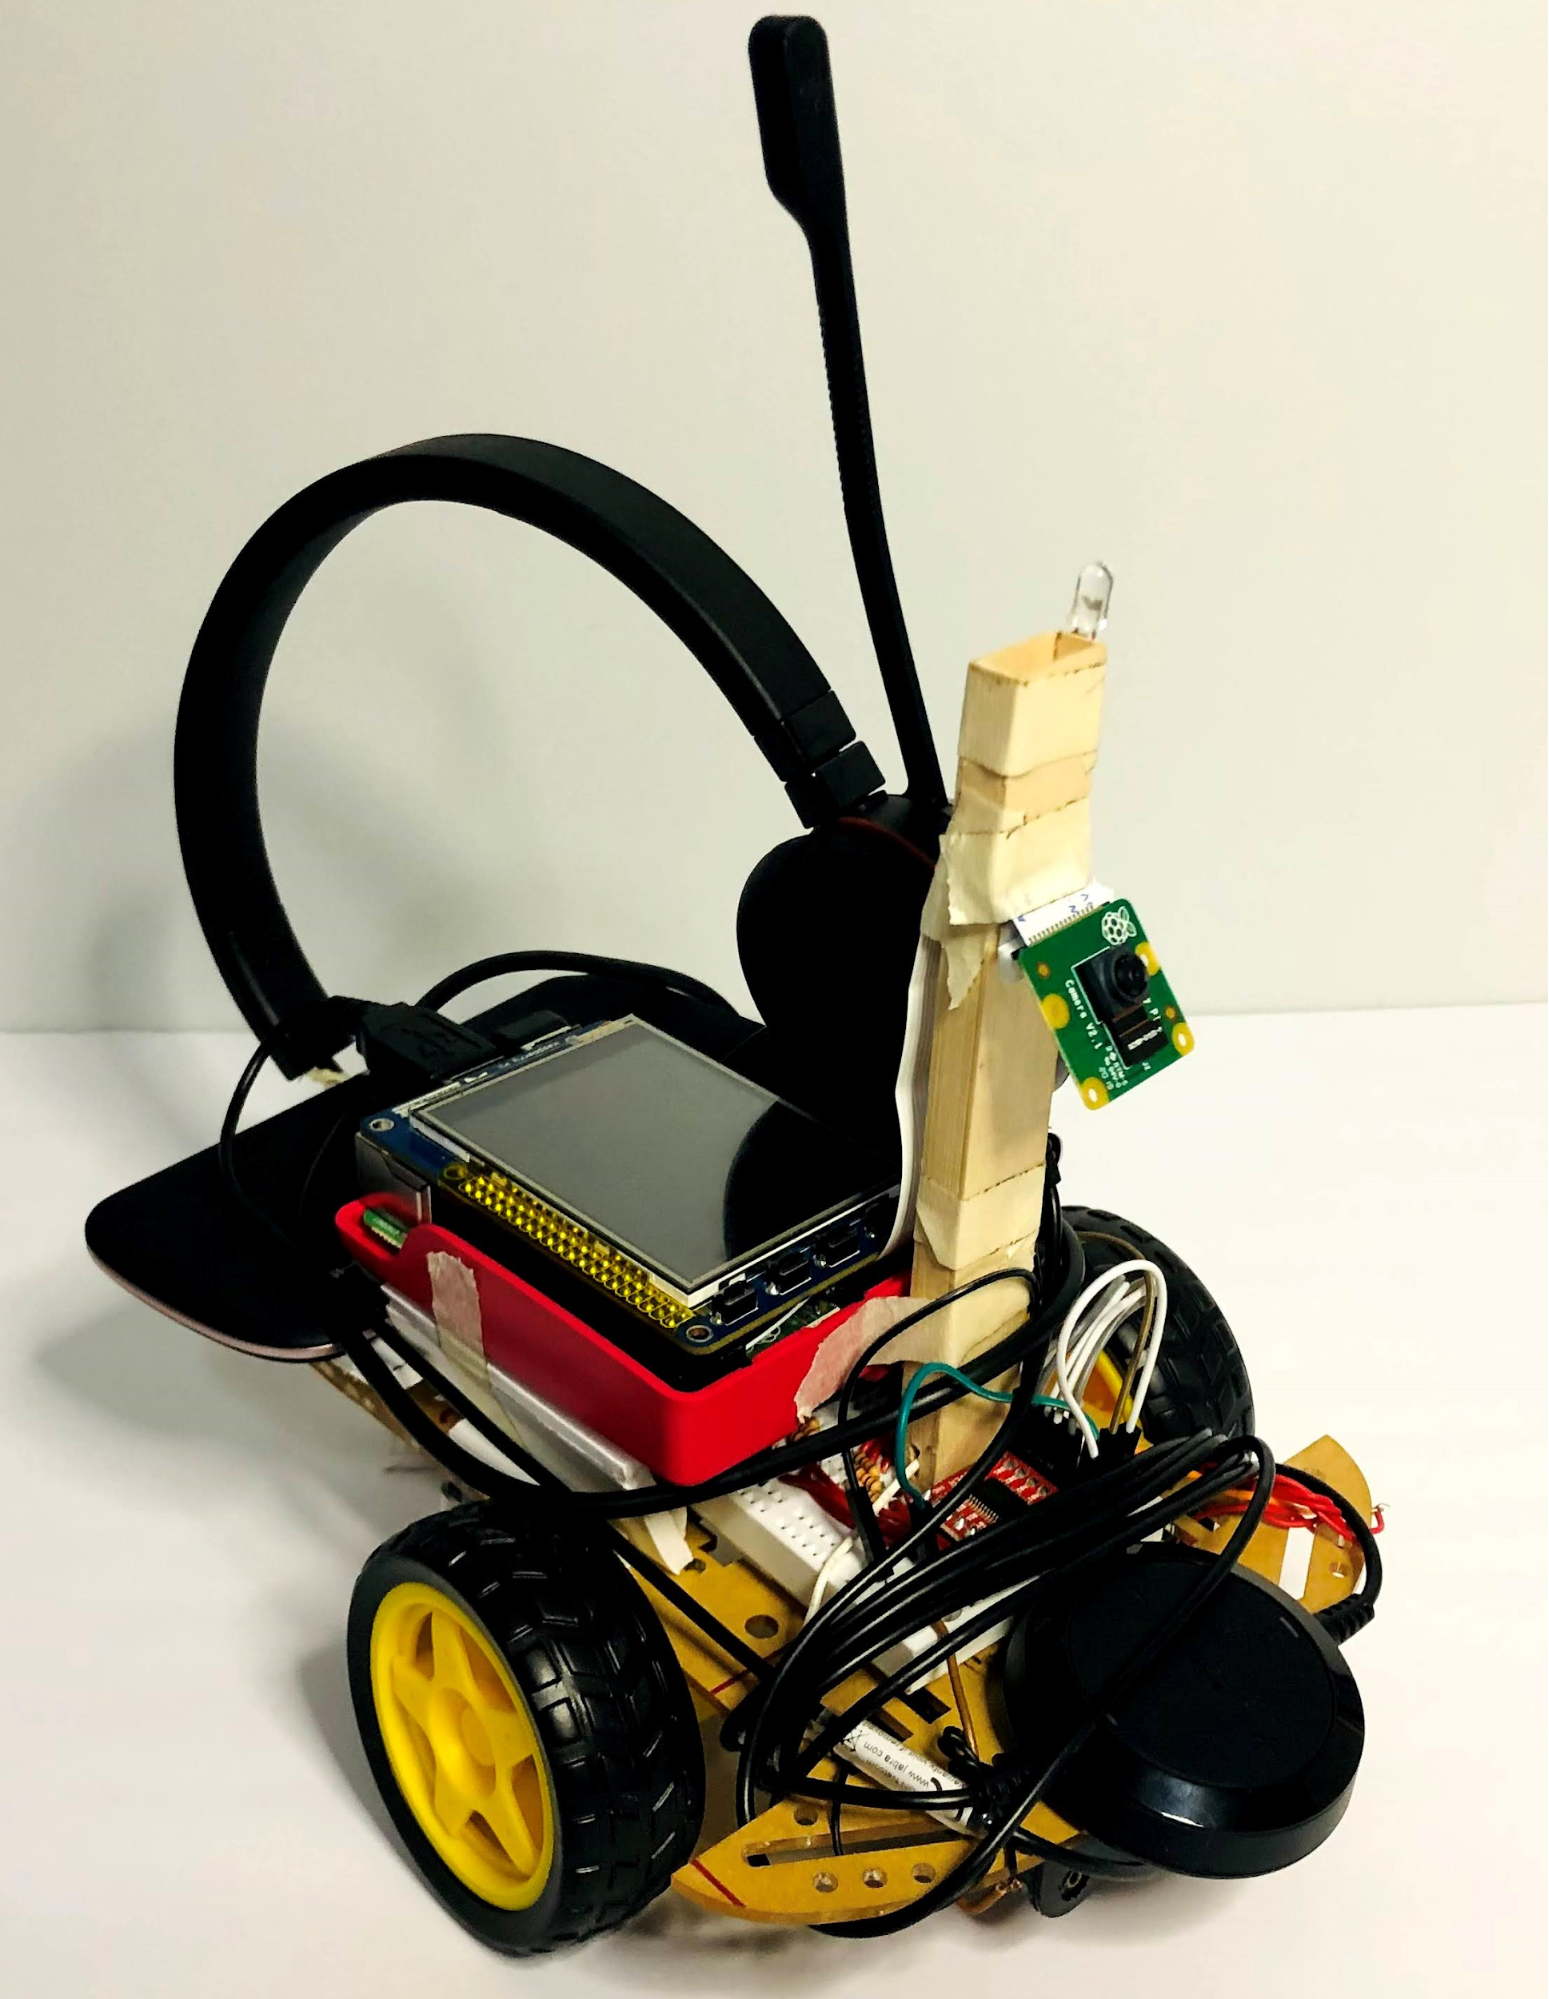
Figure 1: Sparky Build - John’s on left (mic not shown), Carlos’s on right
General Features
The key programmed features are as follows:
Voice Commands:
At any moment while Sparky is sitting still and not performing any of the tasks the user can call Sparky by using his name and then after providing the correct structure sentence with the intentions that the user wants Sparky to perform. Once Sparky detects his name an LED will light up (similar to Alexa) signaling that whatever is said next will be processed as the intentions (voice commands) of the user and determine if what is said is understandable. The LED light will be on for 5 seconds and then turn off, during the time the LED light is on the user can speak to Sparky, if the light is to turn off the hotword Sparky will need to be said again in order to speak to Sparky.
- Sparky (hot word for starting activation)
- Basic Movement
- Go/Move/do a - (1)Forward, (2)Back, (3)Left, (4)Right, (5) Spin
- Search
- Find / Look for - (1)John, (2)Carlos
- Tricks
- Party Mode/Time
- Break Dance - (1)Hit It, (2)Now
Face Identification:
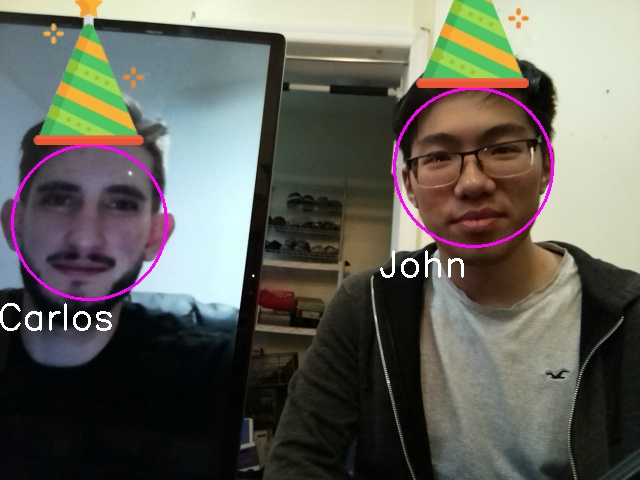
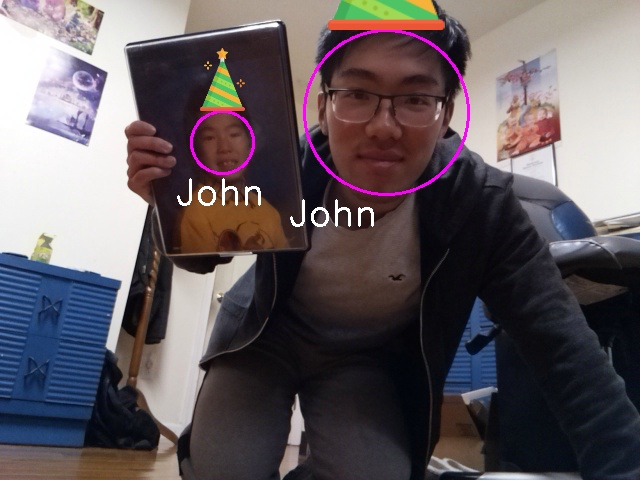
- Party Mode: most easily visible from party mode, Sparky will activate a 10s photo timer and additionally animate a party hat on any visible faces in front of Sparky. For recognized persons, they are given a proper party hat, while unknown faces are given a simple yellow triangle hat. The photo is then snapshotted and printed at the bottom left corner of our piTFT. The files are additionally saved to be opened later if desired.

- Search Mode: upon activation, Sparky will do some quick movements in search of the requested person, either Carlos or John. After doing some in place rotations, upon recognition, Sparky will then stop and then progressively drive towards the target until it is decided that the person requested is close enough to Sparky.
Untethered Operation:
- Sparky works independently of an internet connection and a wall-powered energy source. Sparky carries an on-board lithium rechargeable battery to power the Raspberry Pi and 4 AA batteries to deal with motor power.
Is a Robot Pet:
- Cuteness is always a bonus point.
Design and Testing
With our project starting in early November 2020, we drew an initial schematic of our desired design as shown below. The general idea remained largely the same with a few changes with regards to our voice recognition method and the lack of a magnet or any objects to pick up with the magnet. In the next section, we detail the final build of our project.

Figure 2: Early Prototype Design
Build and Construction
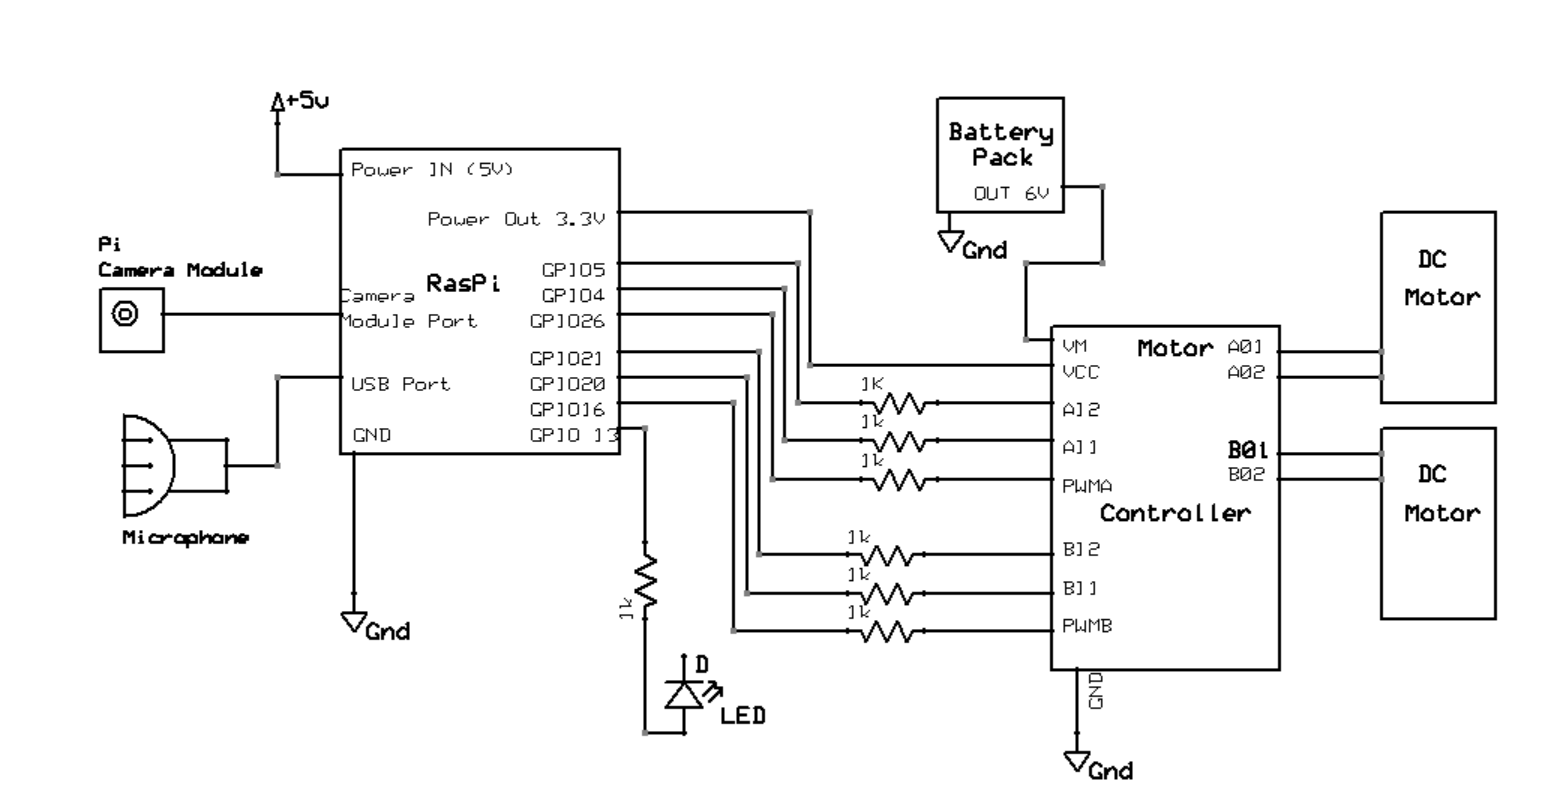
Figure 3: Sparky Wiring and Circuit Design
The assembly of our robo pet builds off of a previous lab, Lab 3, reusing the same chassis, motors, motor controller, and battery design. The major additions are the camera, the microphone, and additional construction materials for mounting.
This project uses a Raspberry Pi 4 2GB with PiTFT Display on top. Connected to the display is a breakout cable which is inserted into a full sized breadboard. Here on this breadboard, we have wiring for our motor controller as well as our two DC motors, and Sparky’s notification LED. These objects are all attached to a thin acrylic plate with mounting holes. While our overall construction is not ideal in terms of sturdiness, it is perfectly suitable for prototyping our design. Underneath and towards the back of our chassis is a ~2200mAh lithium ion battery responsible for directly powering our Raspberry Pi when Sparky is set to work untethered. Towards the front of the chassis is a 6V AA battery holder used to power our motors. Our motor controller is the Sparkfun TB6612FNG dual-channel motor controller as shown below. It gives us control of both independent motor operation as well as duty cycle to assist with making turns and changing speeds.
PWMA → GPIO 26 PWMB → GPIO 16
INA1 → GPIO 4 INB1 → GPIO 20
INA2 → GPIO 5 INB2 → GPIO 21
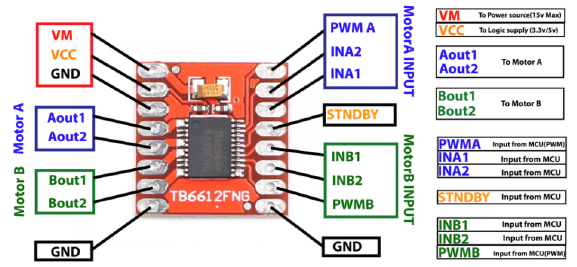
Figure 4: Sparkfun TB6612FNG dual-channel motor controller
Shown below is the underside with our battery placement, motors, and wheels all easily visible.
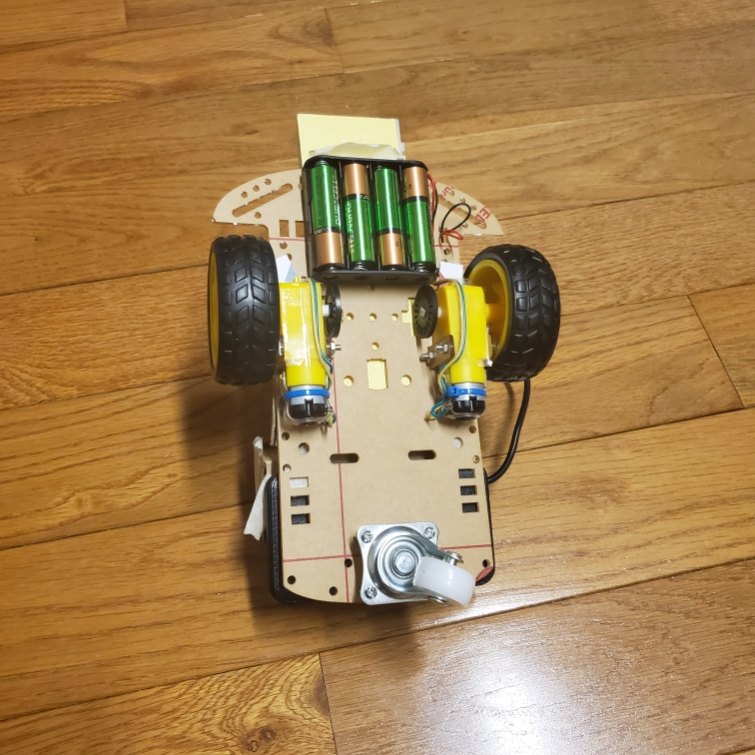
Figure 5: Underside of Sparky
As seen in Figure 1, the Raspberry Pi V2 Camera Module is placed directly facing forward and as high as possible upon the robot to get an angle closer to head level for face detection and recognition. Due to the constraints of our build, Sparky performs most optimally on a table surface where one’s face is most visible from the camera’s perspective due to the height. In a more advanced build there would be more room for an actuated camera with an additional degree of freedom to pivot and look around during operation. Our cameras are stood up onto our robot primarily using cardboard/wood splints. What is not displayed here is that Sparky additionally uses a USB connected mic for receiving audio. We individually found our own mics to use, but any small and lightweight omnidirectional microphone is ideal here. John substituted in a Blue Snowball iCE Microphone with a long wire while Carlos used a small headset and strapped it around Sparky.
Voice recognition
Microphone Input:
With any USB microphone connected to the Py we use the pyaudio() library to establish an audio stream from the microphone by setting variable pa = pyaudio.PyAudio(). Next we open the audio stream pa.open() and set the sample rate, channels, format, and size of the buffer inside this variable (configuration based on the pyadudio library). The values used for the rate, format and frames_per_buffer are taken from the picovoice library because we will later process the audio stream using the picovoice library and there must be congruence between the audio format and the necessary requirements of the picovoice library. The audio_stream variable setup is shown below.
audio_stream = pa.open(
	rate=_picovoice.sample_rate,
	channels=1,
	format=pyaudio.paInt16,
	input=True,
	frames_per_buffer=_picovoice.frame_length)
Using Picovoice():
The picovoice engine accepts 16-bit linearly-encoded PCM and operates on a single-channel. The audio is processed in consecutive frames. Picovoice is able to understand wake words (hotword) and after the recognition of the wake word it detects the intentions of the user using inference. Both the wake word and the inference are customizable and can be created using the online picovoice console, after the desired phrases are created and trained online we can download the trained files that pertain to the wake word and inferences. The wake word is .ppn type file and the inference is a .rhn type file. The path to these files are placed inside variable _picovoice along with other configurations seen below.
_picovoice=Picovoice(
	keyword_path=_keyword_path,
	wake_word_callback=wake_word_callback,
	context_path=_context_path,
	inference_callback=inference_callback,
	porcupine_library_path=None,
	porcupine_model_path=None,
	rhino_sensitivity=0.2,
	rhino_library_path=None,
	rhino_model_path=None,
	porcupine_sensitivity=1)
Variables wake_word_callback and inferecence_callback are assigned to a respective function that handles the signal of such an event occurring. Variables rhino_sensitivity and porcupine_sensitivy are assigned a value from [0-1] where 1 is the most sensitive value for the library to react to inferences and to the wake word respectively. We set the hot word sensitivity to the 1 to make sure a call to Sparky will be very easily recognized. The value set for the inference is low to make sure that the spoken commands are correctly ottered and so that the library is not set off by incorrectly uttered commands that are not part of Sparky’s understanding.
We opted for our audio to be constantly running and processing the information gathered from the microphone, therefore at the beginning of the while loop we set variable pcm = audio_stream.read(_picovoice.frame_length,exception_on_overflow=False) in order to read the microphone, on the next line we edit the variable pcm = struct.unpack_from("h" * _picovoice.frame_length, pcm) to unpack the information from the audio into a format picovoice expects and finally we process the data _picovoice.process(pcm).
def wake_word_callback():
This function is accessed when the word “Sparky” is recognized by picovoice engine. Here we set all mode flags to false, light up the LED connected to GPIO pin 13, set flag intention.led_on to True which will allow us to turn off the LED after 5 seconds, we also stop the motors of the robot. The main purpose behind this is to give the sense that when Sparky is called he stops what he is doing and listens to the next instructions.
def inference_callback():
After the wake word is recognized and the inferences spoken are understood this function accessed in here we enable the flags that set off the modes inside the while based on the values of inference.intent which can be either ‘move’ or search’ strings. Variable inference. slots[] is a dictionary type and contains the value of slot under the uttered intent. Along with enabling the correct flag we write the value of the action Sparky is taking into variable intention.word as a string ( used later on to write on the TFT display). We initiate variable timerStart= time.time() to be used in modes where a time limit is implemented, we read this value to know when the mode began.
Face Detection and Recognition
Face Detection Algorithm
Overall while many face detection and recognition libraries, choosing an appropriate method for our device had some challenges. Initially, we developed Sparky using the Local Binary Patterns Histograms (LBPH) algorithm available through the OpenCV library. More information about how this method works can be found here , but in summary the algorithm takes in grayscale images and uses thresholding to turn the pixel array into binary data. From here a histogram of the data is created and based on new incoming images. Those images are treated similarly and compared across various histogram values. Based on some differences between the values, a confidence value can be calculated to determine a person’s face. Initially this method seemed to work fine, properly identifying and labeling John’s face, but after further testing, we found that while the algorithm works okay for already pretrained images, it had some biases towards already trained faces and resulted in lots of errors especially with faces that were supposed to be unknown to the system.
As a result, towards the later half of the project we pivoted towards using the significantly more accurate face_recognition library linked here . According to the documentation, this library was trained using the Dlib C++ library along with deep learning methods. The result here is that key facial features are determined primarily through color gradient changes within a face. These results are recorded in a histogram of oriented gradients (HOG) which is then encoded for usage with our facial recognition model. With these gradients it is possible to discern key landmark features such as the eye shape, eyebrows, nose shape, mouth, and jawline. Additional details on the deep learning algorithm used can be found here .
In our pivot from using the LBPH model method provided in OpenCV to the face_recogniton library written by ageitgey, there were a few major resulting changes. Firstly, face recognition was significantly improved and with very high accuracy. The major tradeoff though was that the necessary computing power was much more significant and resulted in our smooth video feed losing many frames. A few factors are the cause for this, but some potential solutions for improving computation times would be having a processor better suited for calculated parallel computations and with better single core performance. On a standard desktop, this can be achieved through using Nvidia’s CUDA cores or a high performance CPU. One potential other issue is that our compilation of dlib using pip3 install may have some strange performance errors as opposed to compiling the library on board our Raspberry Pi. This has not been tested though as this potential solution was only recently found by us.
Face Recognition Training Data
As Sparky is currently, he only can recognize pretrained faces. It would very much be possible to have active face recognition work with new faces during operation but we’ll leave that for a possible future implementation. Using this guide from Caroline Dunn, we were able to make a face recognition system that ran using active video data instead of just identifying still images as provided by the face_recognition library. To first train our encodings for face recognition, we start by taking a collection of photos of primarily one's face while rotated to different angles. For John, he additionally took photos with and without glasses. We used about 20-30 images but the face_detection library is supposedly very capable with even just 10 images. With our input data of identifying names and images, we first take our image data captured in BGR format and convert it to RGB before using the face recognition library to determine face positions as well as create encodings in HOG model format.
boxes = face_recognition.face_locations(rgb, model="hog")
    encodings = face_recognition.face_encodings(rgb, boxes)
    for encoding in encodings:
        knownEncodings.append(encoding)
        knownNames.append(name)
The Python pickle library allows us to save our data into a serialized format.
data = {"encodings": knownEncodings, "names": knownNames}
f = open("encodings.pickle", "wb")
f.write(pickle.dumps(data))
f.close()
Face Recognition Implementation
For both face recognition algorithms described, our system first required face detection using OpenCV’s Haar Feature-based Cascade Classifier model which is able to quickly detect objects, but in our case faces. The difference between face detection and face recognition is that recognition is more specific and allows for us to distinguish between faces whereas face detection only provides us with the ability to determine if a human face is present. The model is available pre-trained but is generally created using lots of positive (faces) and negative (no faces) images. From there, the differences allow for key features to be extracted and to create a model. The return from this face detection when using detector.detectMultiScale() where detector is a CascadeClassifier is a set of 4 values describing the pixel values of a box surrounding the detected person’s face from within an image. The format of this is (x,y,w,h) where x and y describe the starting position of the box from the top left corner while w and h describe the pixel width and height of the box respectively. While this classifier only uses grayscale images, our face recognition algorithm uses RGB format images thus we must create both forms of images. For those unfamiliar, it is also important to note that in pixel arrays (0,0) starts from the top left corner.
  img_gray = cv2.cvtColor(img, cv2.COLOR_BGR2GRAY)
    img_rgb = cv2.cvtColor(img, cv2.COLOR_BGR2RGB)

    # simple face detection
    faces = detector.detectMultiScale( img_gray, scaleFactor = 1.3,
minNeighbors = 5, minSize = (int(minW), int(minH)),
flags = cv2.CASCADE_SCALE_IMAGE
    )
In addition to the OpenCV library being responsible for opening up our camera and reading the incoming signal, we also used it for drawing and labeling on top of our images. The library includes the ability to draw shapes and write text as desired at different pixel coordinates. Some of that can be seen below. In the case that we cannot identify a person, the written name is defaulted to “Unknown” and they are labeled as such.
 cv2.ellipse(img, (center[0], center[1]), (w//2, h//2), 0, 0, 360, (255, 0, 255), 2)
  cv2.putText(img, str(name), (leftX-15,bottomY+30), font, 1.2, (255,255,255), 2)
Move mode:
When instruction.v_direction is True, Sparky’s motors move in the direction specified by the user that direction is read from variable instruction.word. For each of the directions there is a call to function movement_3sec(“direction”,speed, speed) which will make the motors move in the “direction” uttered. Inside the function movement_3sec() a timer is implemented for directions ('forward', 'backward', 'right', and 'left') of half a second implemented to make Sparky stop after the timer is over. Using pygame we also update the TFT display message to display what Sparky is doing.
if instruction.v_direction:
	if instruction.word == 'forward':
				movement_3sec('forward',90,90)
	if instruction.word == 'back':
				movement_3sec('backward',90,90)
	if instruction.word == 'right':
				movement_3sec('right',90,90)
	if instruction.word == 'left':
				movement_3sec('left',90,90)
	if instruction.word == 'spin':
				tw.drive("left",90,90)

	screen.fill(BLACK, textAreaRect)
	text = fontLg.render(f'Moving {instruction.word}', True, WHITE, BLACK)
	textRect = text.get_rect(center=(0.5*dispW, 0.75*dispH))
	screen.fill(BLACK, textRect.inflate(240,0))
            screen.blit(text,textRect)
            pygame.display.update(textRect)
Search Mode:
When variable instruction.v_search is true we can tell Sparky to begin the process of finding the user specified. First the text on theTFT is updated to show the change in mode, Sparky displays ‘Looking for ‘user’...’. A timer condition of 20 seconds is set so that Sparky only performs the task of searching for 20 seconds. Inside this condition there is a call to the function foundFace = find_faces(instruction.word, img). If the function returns True, that means the target user was found in that direction, then we stop running the find_faces function and we proceed to running the detect_faces_quick function. Our return value, facePresent = detect_faces_quick(img)will be t rue if there is a singular detectable face still in the view of the camera. If facePresent is true we perform pursue_target(True) which will guide the robot closer towards the face based on the location of the face on the image from the camera. If facePresent is false then we run the function identify_faces() which determines if the user requested is found in the field of view of the camera, this function then returns a value for target and then again we perform pursue_target if target=True.I n the case of target= False we increment variable misses , after 10 consecutive misses (misses >10) we then try again and run the find_faces function.
The main reason for dividing the face recognition steps like this is to make an adjustment between running a very heavy face recognition process, which provides the best results on identifying the user, and being able to pursuing the target in the correct direction. If the heavy face recognition function is always running it has an enormous effect on the framerate of the camera which then translates to erroneous movements of the robot because we are moving faster than what our image processing can return. This causes a delay on the reaction of the motors and a bad performance by Sparky. We opted to implement the search algorithm this way so that after finding our target our driving motion towards the face consists of using face detection only for approximately 95% of the time (light on the processor) and then we use proper face recognition for the remaining other 5% of the time (heavy on the processor). This way we make sure that Sparky makes faster motor adjustment decisions when moving towards the target and also that he recognizes the face with high precision. Once Sparky reaches the target user, the flag stopCondition is set and we exit the search mode (set instruction.v_search =False ) and set all variables back to their starting value, we also update the TFT display to notify that the user was found. While Sparky is trying to find the user, a counter is displayed onto the screen showing how much time has elapsed since the search began, and as previously stated once the count reaches its limit of 20 seconds, Sparky stops the search.
Tricks Mode:
For Sparky to go into this mode the variabel instruction.v_tricks is set to true by the voice recognition. Inside this condition we look at variable instruction.word and determine if it's equal to ‘party’ or ‘break dance’, the two tricks that Sparky can do.
If instruction.word == ‘party’, we then again update the tft display to show what Sparky is doing and we run function _,_,img = identify_faces(None, img, mode = "party_time") this is the same face detection function previously used by the search mode but since in this case the motors for Sparky are not running we take the privilege to run it without constraints. We pass mode= “party_time” to the function to tell it that it will not only do face recognition but will also draw on top of the user the trade-marked party hats. For users that Sparky knows (Carlos and John) the hat is special and for people that Sparky doesn’t know yet they will receive just an outlined triangle. This mode will run for 10 seconds and also display a 10 second counter on the screen at the end of the time Sparky exits the mode and waits for his next instructions.
If instruction.word == ‘break dance’ , then TFT display is updated and a function call to move_breakdance() is made. This function moves the motors so that sparky alternates between moving right and left. Sparky looks like he is wiggling in place.
Motor Control and Face Pursuit Mode
Motor Control
Sparky’s motor control largely comes from previously developed code for Lab 3 of ECE 5725. The code exists in two_wheel_mod.py and is responsible for initializing PWM signals for controlling the duty cycle of our motors. While the set duty cycle controls the turn speed, we can change the voltage sent to our control pins to also change the turn direction of our motors. With these functions combined, the file primarily includes a function drive() which makes it easier for making movement decisions with our robot. For example, it allows us to adjust for movement forward as well as individual motor spin speed. This is especially key to making micro adjustments to our travel path with Sparky when he is traveling forward.
Face Pursuit
When locating a person from one of the three functions, find_faces(), detect_faces_quick(), or identify_faces() our robot Sparky will stop his motors and then determine an appropriate path for traveling to our desired target. Taking the center of our target as identified in our video feed, we can determine a relative offset from the center and therefore slow down the respective motors such that our robot will slowly turn towards our target while trying to maintain the target position at the center of Sparky’s vision. These conditions occur inside of pursue_target() and adjust our robot accordingly. We have this driving mode occur for a short period of time with our robot stuck inside a while loop, as we cannot process voice data during search mode anyways. When exiting, Sparky will then try to evaluate his position relative to the target. During this reevaluation, Sparky will then decide to do one of the three previously mentioned functions.
As detailed earlier in the Face Recognition Implementation section, Sparky will use detect_faces_quick() , to just follow the face in front of him. If there is more than one or less than one face visible, we will default to doing a fully intensive identify_faces() call which provides us details on which of the correct faces to pursue. Because identify_faces() is so intensive for our image processing, we use a randomly generated number to allow Sparky to check using identify_faces about 1% of the time inside of detect_faces_quick in the scenario where this one visible subject. While not an ideal way of truly making our search process, use identify_faces only about 1% of the time, we found the solution to be good enough. In the case that we ever got a wrong reading for face recognition, which is unlikely, or our robot has lost sight of the target, Sparky will count the amount of consecutive misses and eventually return to the find_faces() function if we cannot find our target. Lastly, the find_faces() operates by primarily having Sparky pivot counterclockwise, while slowly polling for the target face using identify_faces() . To start though, upon a new search request, Sparky will do a quick pivot left and then right as a fun gesture, making him act like a robo pet. In the case that the desired person is found, Sparky will then exit and make his travel towards the target. Sparky is more likely to find a person while turning slowly though. In addition, there is additional tuning movement which rotates Sparky back right by a bit as there tends to be some delay between the face recognition and when Sparky’s camera has already passed the target. Finally, after traveling to the requested person, Sparky’s search will come to a close after the desired target has reached an experimentally determined threshold value for proximity based on the amount of screen space the target person's head takes up in the captured video.
Results
Overall Sparky performs spectacularly in day to day testing. Sparky is able to detect voices from good ranges away and responds to anyone’s voice as long as they follow the pre-trained word models. Even over Zoom, Sparky is likely to respond. As for motor control, Sparky is able to respond to movement commands consistently and also make his way to the desired target a large part of the time. While not perfect or as fast as we had initially tested with, the tradeoff for very accurate face recognition seems to be a worthwhile enough limitation on his tracking ability and video processing. While we did not follow the goals we initially set out on to their entirety, we find that the end result is very satisfying nonetheless. Some of the initial project ideas included, using an Alexa AI to handle voice processing as well as the potential for Sparky to deliver objects to our targets as a bonus feature. Instead, we turned towards having Sparky do physical tricks with his wheels as well as being able to save photos and add decorations to peoples faces similar to AR Snapchat features.
Conclusion
We were able to create a fully autonomous robot that is controlled through voice and performs facial recognition for both of the creators as well as the face detection for other persons. All of the processing of voice and facial recognition is done on the Raspberry Pi. The system as a whole ended up being what we set out to do it includes the use of a camera, a microphone, DC motors with motor controller, and TFT display. The end result manifests itself as an interesting robot that behaves much like a pet, your very own desk companion SPARKY!
Our biggest challenges we faced when trying to implement the whole system have to be buffer size and the difference in hardware. The buffer size really infringed in the implementation of the project because we really wanted to be able to run both facial recognition and voice together but the size of the buffer did not allow for that when running facial recognition the voice input to the microphone will not be read into the buffer due to overflow. Our way around it was to first turn off the exception caused by the buffer overflow and then after put timers in place when Sparky will go into facial recognition mode. Turning off the overflow exception does diminish to some extent the voice recognition because missed information is now more common. The effect can also be seen with the facial recognition side in the frame rate and pixel density of the video. A larger buffer would’ve allowed us to process information a lot more smoothly.
Since we built two separate Sparky systems the differences between dc motors, batteries, and driving terrain made us make adjustments to our implementation since many times going from one robot to another we noticed the discrepancy in the movement of sparky. In the case of search mode using facial recognition we opted for making slower and more jittery movements when spinning around looking for faces by stopping before making the next advancement. This was after attempting to use LBPH face recognition which we deemed to be too inaccurate.
Future Work
We are very happy with the features we were able to give Sparky, but as always with more time we could have added much more to our friend. Looking into the possibilities of what could be next we could implement sensors that help Sparky navigate the desk better and keep him on top of it. The next evolution of Sparky should definitely involve a helper arm that can reach for objects around the table as well as an actuated stereo camera for better vision and depth sensing. Another way to help improve Sparky’s performance could be by parallelizing the code using threads, scheduling based on priority and conditional variables to help with the heavy tool that voice and face recognition together put on the processor. Lastly, the mechanical design of Sparky could be refined to better handle the weight of the batteries and Raspberry PI
Team
Overall the work for this project was pretty evenly distributed. We worked on the overall design and code development together as well as the final report.

John Ly
jtl222@cornell.edu
Cornell Electrical and Computer Engineer 2021
Responsible for face detection and recognition, motor control functions, face tracking and pursuit mode, party mode effects, and video editing
Carlos Gutierrez
cag334@cornell.edu
Cornell Electrical and Computer Engineer 2021
Voice detection and processing, voice movement modes, tricks mode, piTFT image display
Appendix
Bill of Materials
|
Product |
Cost |
Provided? |
|
Raspberry Pi 4 2GB |
$35.00 |
Yes |
|
Adafruit piTFT 2.8” |
$35.00 |
Yes |
|
2 DC motors & Chassis |
$13.99 |
Yes |
|
SparkFun Motor Driver - Dual TB6612FNG (1A) |
$4.96 |
Yes |
|
Raspberry Pi Camera Module v2 |
$23.98 |
Yes (Requested) |
|
USB microphone |
$10.00 |
No |
|
Wires, LEDs, Tape, Cardboard |
N/A |
No |
Total: $122.93
References
Voice:
- https://github.com/Picovoice/picovoice
- https://pimylifeup.com/raspberry-pi-porcupine/
- https://picovoice.ai/docs/api/picovoice-python/
- https://pypi.org/project/pvporcupinedemo/
- https://console.picovoice.ai/rhn/835553fe-4051-4d9e-8552-ed07a6e29d01#intent-move
- https://stackoverflow.com/questions/10733903/pyaudio-input-overflowed
- https://github.com/Picovoice/picovoice/blob/master/demo/python/picovoice_demo_mic.py
Vision:
- https://www.pyimagesearch.com/2018/09/24/opencv-face-recognition/
- https://projects.raspberrypi.org/en/projects/getting-started-with-picamera/6
- https://www.pyimagesearch.com/2015/03/30/accessing-the-raspberry-pi-camera-with-opencv-and-python/
- https://docs.opencv.org/master/d6/d00/tutorial_py_root.html
- https://towardsdatascience.com/real-time-face-recognition-an-end-to-end-project-b738bb0f7348
- https://towardsdatascience.com/face-recognition-how-lbph-works-90ec258c3d6b
- https://www.tomshardware.com/how-to/raspberry-pi-facial-recognition
- https://github.com/ageitgey/face_recognition
Code Appendix
sparky_beta.py
1 2 3 4 5 6 7 8 9 10 11 12 13 14 15 16 17 18 19 20 21 22 23 24 25 26 27 28 29 30 31 32 33 34 35 36 37 38 39 40 41 42 43 44 45 46 47 48 49 50 51 52 53 54 55 56 57 58 59 60 61 62 63 64 65 66 67 68 69 70 71 72 73 74 75 76 77 78 79 80 81 82 83 84 85 86 87 88 89 90 91 92 93 94 95 96 97 98 99 100 101 102 103 104 105 106 107 108 109 110 111 112 113 114 115 116 117 118 119 120 121 122 123 124 125 126 127 128 129 130 131 132 133 134 135 136 137 138 139 140 141 142 143 144 145 146 147 148 149 150 151 152 153 154 155 156 157 158 159 160 161 162 163 164 165 166 167 168 169 170 171 172 173 174 175 176 177 178 179 180 181 182 183 184 185 186 187 188 189 190 191 192 193 194 195 196 197 198 199 200 201 202 203 204 205 206 207 208 209 210 211 212 213 214 215 216 217 218 219 220 221 222 223 224 225 226 227 228 229 230 231 232 233 234 235 236 237 238 239 240 241 242 243 244 245 246 247 248 249 250 251 252 253 254 255 256 257 258 259 260 261 262 263 264 265 266 267 268 269 270 271 272 273 274 275 276 277 278 279 280 281 282 283 284 285 286 287 288 289 290 291 292 293 294 295 296 297 298 299 300 301 302 303 304 305 306 307 308 309 310 311 312 313 314 315 316 317 318 319 320 321 322 323 324 325 326 327 328 329 330 331 332 333 334 335 336 337 338 339 340 341 342 343 344 345 346 347 348 349 350 351 352 353 354 355 356 357 358 359 360 361 362 363 364 365 366 367 368 369 370 371 372 373 374 375 376 377 378 379 380 381 382 383 384 385 386 387 388 389 390 391 392 393 394 395 396 397 398 399 400 401 402 403 404 405 406 407 408 409 410 411 412 413 414 415 416 417 418 419 420 421 422 423 424 425 426 427 428 429 430 431 432 433 434 435 436 437 438 439 440 441 442 443 444 445 446 447 448 449 450 451 452 453 454 455 456 457 458 459 460 461 462 463 464 465 466 467 468 469 470 471 472 473 474 475 476 477 478 479 480 481 482 483 484 485 486 487 488 489 490 491 492 493 494 495 496 497 498 499 500 501 502 503 504 505 506 507 508 509 510 511 512 513 514 515 516 517 518 519 520 521 522 523 524 525 526 527 528 529 530 531 532 533 534 535 536 537 538 539 540 541 542 543 544 545 546 547 548 549 550 551 552 553 554 555 556 557 558 559 560 561 562 563 564 565 566 567 568 569 570 571 572 573 574 575 576 577 578 579 580 581 582 583 584 585 586 587 588 589 590 591 592 593 594 595 596 597 598 599 600 601 602 603 604 605 606 607 608 609 610 611 612 613 614 615 616 617 618 619 620 621 622 623 624 625 626 627 628 629 630 631 632 633 634 635 636 637 638 639 640 641 642 643 644 645 646 647 648 649 650 651 652 653 654 655 656 657 658 659 660 661 662 663 664 665 666 667 668 669 670 671 672 673 674 675 676 677 678 679 680 681 682 683 684 685 686 687 688 689 690 691 692 693 694 695 696 697 698 699 700 701 702 703 704 705 706 707 708 709 710 711 | # Sparky Beta (Python 3) # Author: John Ly (jtl222), Carlos Gutierrez (cag334) # Date: December 17, 2020 import struct import numpy as np import os import RPi.GPIO as GPIO import pyaudio from picovoice import Picovoice import sys import two_wheel_mod as tw import time import cv2 import face_recognition import pickle import numpy as np import pygame from pygame.locals import * ################### #-- PYGAME INIT --# ################### os.putenv('SDL_VIDEODRIVER', 'fbcon') # Display on piTFT os.putenv('SDL_FBDEV', '/dev/fb0') # #os.putenv('SDL_MOUSEDRV', 'TSLIB') # Track mouse clicks on piTFT # #os.putenv('SDL_MOUSEDEV', '/dev/input/touchscreen') pygame.init() screen=pygame.display.set_mode((240,320)) # PiTFT Mode # screen=pygame.display.set_mode((360,360)) # Desktop Mode pygame.mouse.set_visible(False) dispW, dispH = screen.get_size() dispRect = pygame.Rect((0,0), (dispW,dispH)) BLACK = (0,0,0) WHITE = (255,255,255) fontSm = pygame.font.SysFont(None, 12) fontLg = pygame.font.SysFont(None, 24) updateText = False party_over = False screen.fill(BLACK) def draw_counter(number): text = fontLg.render(f'{number}', True, WHITE, BLACK) textRect = text.get_rect(center=(0.5*dispW, 0.90*dispH)) screen.fill(BLACK, textRect.inflate(20,0)) screen.blit(text,textRect) pygame.display.update(textRect) #============================================================ #TFT Button Operation #============================================================ panicStop = False GPIO.setmode(GPIO.BCM) # on pin interrupt signal, handle motor functions def GPIO_callback(channel): for pin in tw.piTFT_Buttons: if (not GPIO.input(pin)): print("falling edge detected on {}".format(pin)) if pin is 27: print("\n [INFO] Exiting Program and cleanup stuff") GPIO.cleanup() cam.release() cv2.destroyAllWindows() # pygame.quit() sys.exit() buttonControls = {17:"start", 22:"search", 23:"add_face", 27:"quit"} # setup for all piTFT buttons as inputs using pull up resistors print("setting up piTFT buttons") for pin in tw.piTFT_Buttons: GPIO.setup(pin, GPIO.IN, pull_up_down=GPIO.PUD_UP) print("GPIO {} setup".format(pin)) GPIO.add_event_detect(pin, GPIO.FALLING, callback=GPIO_callback, bouncetime=300) #============================================================ # LEDs #============================================================ GPIO.setup(13,GPIO.OUT) # LED pin #=============================================== #Voice Recognition #=============================================== timerStart = time.time() prevCount = 0 imgCount = 0 _keyword_path="sparky.ppn" #sparky hotword (to initiate) _context_path="sparky.rhn" #uses the smart lighting intents ( we changing it to our own) pa = None audio_stream = None class v_instructions: v_search=False v_direction=False v_tricks=False led_on=False word='' instruction=v_instructions() global instructions def wake_word_callback(): print('[wake word]\n') GPIO.output(13, GPIO.HIGH) instruction.led_on=True tw.drive('stop') instruction.v_search=False instruction.v_direction=False instruction.v_tricks=False #### Example: Sparky, turn all the lights on def inference_callback(inference): global updateText, timerStart timerStart = time.time() if inference.is_understood: instruction.v_search=False instruction.v_direction=False instruction.v_tricks=False print(inference) updateText = True if inference.intent == 'search': instruction.v_search=True instruction.word=inference.slots['users'] print(f"Looking for friend {instruction.word} .....") elif inference.intent =='move': for slot,value in inference.slots.items(): if slot == 'direction': instruction.v_direction=True instruction.word=value elif slot == 'tricks': instruction.v_tricks=True instruction.word=value else: instruction.word='' else: instruction.word='' ''' if inference.is_understood: print('{') print(" intent : '%s'" % inference.intent) print(' slots : {') print(inference.slots.items()) for slot, value in inference.slots.items(): print(" %s : '%s'" % (slot, value)) print(' }') print('}\n') else: print("Didn't understand the command.\n") ''' _picovoice=Picovoice( keyword_path=_keyword_path, wake_word_callback=wake_word_callback, context_path=_context_path, inference_callback=inference_callback, porcupine_library_path=None, porcupine_model_path=None, rhino_sensitivity=0.2, rhino_library_path=None, rhino_model_path=None, porcupine_sensitivity=1) pa = pyaudio.PyAudio() audio_stream = pa.open( rate=_picovoice.sample_rate, channels=1, format=pyaudio.paInt16, input=True, frames_per_buffer=_picovoice.frame_length) #============================================================= # Movement #============================================================= endtime=0 led_endtime=0 turn=True def movement_3sec(direction: 'string', speedL: "int" =75, speedR: "int" =75): global endtime,turn,updateText if direction == 'forward' or 'backward' or 'right' or 'left': tw.drive(direction,speedL,speedR) else: tw.drive("left",90,90) print(time.time()) print(endtime) if time.time() > endtime: if endtime >0: tw.drive('stop',speedL,speedR) endtime=0 instruction.v_direction=False updateText=False else: endtime=time.time()+0.5 c=0 def move_breakdance(): global c,endtime if (c % 2) ==0: tw.drive('stop') tw.drive("left",50,50) else: tw.drive('stop') tw.drive("right",60,60) if time.time() > endtime: if endtime >0: c+=1 endtime=0 if c >= 10: tw.drive('stop') instruction.v_tricks=False c=0 else: endtime=time.time()+0.5 ######################## #-- FACE RECOGNITION --# ######################## #Initialize 'currentname' to trigger only when a new person is identified. currentname = "unknown" #Determine faces from encodings.pickle file model created from train_model.py encodingsP = "encodings.pickle" #use this xml file cascade = "haarcascade_frontalface_default.xml" # load the known faces and embeddings along with OpenCV's Haar # cascade for face detection print("[INFO] loading encodings + face detector...") data = pickle.loads(open(encodingsP, "rb").read()) detector = cv2.CascadeClassifier(cascade) font = cv2.FONT_HERSHEY_SIMPLEX # Initialize and start realtime video capture cam = cv2.VideoCapture(0) camW, camH = 640,480 #960,720 # 1280,720 cam.set(3, camW) # set video width cam.set(4, camH) # set video height camRect = pygame.Rect((0,0), (camW,camH)) camWs, camHs = 240, 180 textAreaRect = pygame.Rect((0,camHs), (dispW,dispH-camHs)) # fps = FPS().start() # Define min window size to be recognized as a face minW = 0.05*cam.get(3) minH = 0.05*cam.get(4) # Define parameters for pursuit # target = False speed = 90 midX = camW/2 driveTime = time.time() #targetPerson = "John" # change to output of voice input findFaceInit = True search = True misses = 0 # Rotate until we find an identifiable face # Return true if the desired person is found def find_faces(targetPerson, img): global findFaceInit # print(f"Init: {findFaceInit}") target = False # print("search mode") # Do a fun search init maneuver # quickly spin ~180 left then right if findFaceInit: findFaceInit = False for turn in ['left', 'right']: startTime = time.time() tw.drive('stop', speed, speed) while time.time() < startTime + 1: tw.drive(turn, 70, 70) target,_,_ = identify_faces(targetPerson, img) if target: driveTime = time.time() + 0.2 while time.time() < driveTime: adjustment = 'right' if turn is 'left' else 'left' tw.drive(adjustment, 60, 60) tw.drive("stop") return True # slowly turn left to find the desired person tw.drive('left', 45, 45) target,_,_ = identify_faces(targetPerson, img) if target: driveTime = time.time() + 0.2 while time.time() < driveTime: tw.drive("right", 60, 60) tw.drive("stop") return True else: # tw.drive("stop") return False def detect_faces_quick(img): # Reads from camera and detects faces quickly # # Params: # targetPerson: (string) name of person we wish to find # Return: # boolean: True if single face present, False if too many faces or none global speed, midX, driveTime, findFaceInit # convert the input frame from (1) BGR to grayscale (for face detection) img_gray = cv2.cvtColor(img, cv2.COLOR_BGR2GRAY) # simple face detection faces = detector.detectMultiScale( img_gray, scaleFactor = 1.3, # higher scaleFactor increases speed of detection for smaller faces but reduces accuarcy minNeighbors = 5, # number of matching rectangles required before allowing face detection minSize = (int(minW), int(minH)), # minimum Size allowed for object detection flags = cv2.CASCADE_SCALE_IMAGE ) # determine number of faces seen # print(np.asarray(faces)) if np.shape(np.asarray(faces))[0] != 1: tw.drive("stop") return False else: chance = np.random.rand(1) if chance < 0.99: for (x,y,w,h) in faces: # when very close, force a face recgnition check if (not search) and (w > camW/4 or h > camH/2): tw.drive("stop") return False centerX, centerY = x + w//2, y + h//2 img = cv2.ellipse(img, (centerX, centerY), (w//2, h//2), 0, 0, 360, (255, 0, 255), 4) driveTime = time.time() + 0.2 midX = (x + w/2)/camW * 100 return True else: return False def identify_faces(targetPerson, img, mode = "None"): # Reads from camera and detects faces # Face Recognition is slow but accurate # # Params: # targetPerson: (string) name of person we wish to find # Return: # target: (boolean) determines if targetPerson is in view and recognized # stopCondition: (boolean) determines if targetPerson is close enough to the camera global speed, midX, driveTime, findFaceInit target = False stopCondition = False # convert the input frame from (1) BGR to grayscale (for face detection) and # (2) from BGR to RGB for (face recogniton) img_gray = cv2.cvtColor(img, cv2.COLOR_BGR2GRAY) img_rgb = cv2.cvtColor(img, cv2.COLOR_BGR2RGB) # simple face detection faces = detector.detectMultiScale( img_gray, scaleFactor = 1.3, # higher scaleFactor increases speed of detection for smaller faces but reduces accuarcy minNeighbors = 5, # number of matching rectangles required before allowing face detection minSize = (int(minW), int(minH)), # minimum Size allowed for object detection flags = cv2.CASCADE_SCALE_IMAGE ) # OpenCV returns bounding box coordinates in (x, y, w, h) order # but we need them in (top, right, bottom, left) order, so we # need to do a bit of reordering boxes = [(y, x + w, y + h, x) for (x, y, w, h) in faces] # compute the facial embeddings for each face bounding box encodings = face_recognition.face_encodings(img_rgb, boxes) names = [] # loop over the facial embeddings for encoding in encodings: # attempt to match each face in the input image to our known # encodings matches = face_recognition.compare_faces(data["encodings"], encoding) name = "Unknown" #if face is not recognized, then print Unknown # check to see if we have found a match if True in matches: # find the indexes of all matched faces then initialize a # dictionary to count the total number of times each face # was matched matchedIdxs = [i for (i, b) in enumerate(matches) if b] counts = {} # loop over the matched indexes and maintain a count for # each recognized face face for i in matchedIdxs: name = data["names"][i] if name is targetPerson: tw.drive("stop") counts[name] = counts.get(name, 0) + 1 # determine the recognized face with the largest number # of votes (note: in the event of an unlikely tie Python # will select first entry in the dictionary) name = max(counts, key=counts.get) # #If someone in your dataset is identified, print their name on the screen # if currentname != name: # currentname = name # print(currentname) # update the list of names names.append(name) # loop over the detected faces and label them for ((topY, rightX, bottomY, leftX), name) in zip(boxes, names): center = ((leftX+rightX)//2, (bottomY+topY)//2) w,h = rightX-leftX, bottomY-topY cv2.ellipse(img, (center[0], center[1]), (w//2, h//2), 0, 0, 360, (255, 0, 255), 2) cv2.putText(img, str(name), (leftX-15,bottomY+30), font, 1.2, (255,255,255), 2) if mode is "party_time": if name is not "Unknown": # Icon made by "https://www.flaticon.com/authors/freepik" hat = cv2.imread('party-hat.png', cv2.IMREAD_UNCHANGED) hat = cv2.resize(hat,(h,h)) hatY, hatX, _ = hat.shape offsetY, offsetX = topY-hatY, center[0]-hatX//2 # top left corner of hat position yStartImg = np.amax([0,offsetY]) yEndImg = np.amax([0,topY]) yStartHat = np.amax([0,hatY-topY]) alpha_hat = hat[:,:,3] / 255.0 alpha_img = 1.0 - alpha_hat # alpha will either be 0 or 1 here # merge images using alpha value to remove hat bkgd for c in range(0,3): img[yStartImg:yEndImg, offsetX:offsetX+hatX, c] = \ alpha_hat[yStartHat:, :] * hat[yStartHat:, :, c] + \ alpha_img[yStartHat:, :] * img[yStartImg:yEndImg, offsetX:offsetX+hatX, c] else: # Draw Triangle Hat pts = np.array([[leftX+w//8,topY], [leftX+w-w//8,topY], [leftX+w//2,topY-w]], np.int32).reshape((-1,1,2)) img = cv2.polylines(img,[pts],True,(0,255,255),4) # determine if person detected is our desired target if name == targetPerson: target = True driveTime = time.time() + 0.05 midX = (leftX + w/2)/camW * 100 # reached destination so stop tracking if (not search) and (w > camW/4 or h > camH/2): target = False stopCondition = True findFaceInit = True tw.drive("stop") return target, stopCondition, img def pursue_target(target): # when we see a known target, have robot travel towards face while target and time.time() < driveTime: # print(f"Target: {targetPerson}, X:{midX}") slowSpeed = speed-(np.abs(50-midX//4)) if slowSpeed <= 0: slowSpeed=0 # print(f"Speed:{slowSpeed}") if midX < 45: tw.drive("forward", slowSpeed, speed) # print("Lean left") elif midX > 55: tw.drive("forward", speed, slowSpeed) # print("Lean right") else: tw.drive("forward", speed, speed) else: tw.drive("forward", 40, 40) try: while True: pcm = audio_stream.read(_picovoice.frame_length,exception_on_overflow=False) pcm = struct.unpack_from("h" * _picovoice.frame_length, pcm) _picovoice.process(pcm) # video capture ret, img =cam.read() img = cv2.flip(img, -1) # Flip vertically # resize for faster processing # img = cv2.resize(img, (640,480), interpolation = cv2.INTER_AREA) if instruction.led_on: if time.time() > led_endtime: if led_endtime >0: GPIO.output(13, GPIO.LOW) led_endtime=0 instruction.led_on=False else: led_endtime=time.time()+5 if instruction.v_direction: if instruction.word == 'forward': movement_3sec('forward',90,90) if instruction.word == 'back': movement_3sec('backward',90,90) if instruction.word == 'right': movement_3sec('right',90,90) if instruction.word == 'left': movement_3sec('left',90,90) if instruction.word == 'spin': tw.drive("left",90,90) screen.fill(BLACK, textAreaRect) text = fontLg.render(f'Moving {instruction.word}', True, WHITE, BLACK) textRect = text.get_rect(center=(0.5*dispW, 0.75*dispH)) screen.fill(BLACK, textRect.inflate(240,0)) screen.blit(text,textRect) pygame.display.update(textRect) if instruction.v_search: #use instruction.word for the user pass to FaceRec #variable contains name of the user asked for #change instruction.v_search to False after user found if updateText: updateText = False search = True # screen.fill(BLACK, textAreaRect) text = fontLg.render(f'Looking for {instruction.word} . . .', True, WHITE, BLACK) textRect = text.get_rect(center=(0.5*dispW, 0.75*dispH)) screen.fill(BLACK, textRect.inflate(240,0)) screen.blit(text,textRect) pygame.display.update(textRect) if time.time() < timerStart + 20: if search: foundFace = find_faces(instruction.word, img) if foundFace: print("spotted...") # time.sleep(0.5) search=False misses = 0 elif foundFace: # after finding our target, move to face 90% of time with face detection only # use face recognition for the other 10% of the time search = False facePresent = detect_faces_quick(img) if facePresent: pursue_target(True) else: tw.drive("stop") target, stopCondition, img = identify_faces(instruction.word, img) if target: misses = 0 pursue_target(target) else: misses += 1 if misses > 10: # driveTime = time.time() + 1.0 # while time.time() < driveTime: # tw.drive("right", 75, 75) # _, _, img = identify_faces(instruction.word, img) foundFace = find_faces(instruction.word, img) # delay search = True foundFace = False if stopCondition: foundFace = False search = True instruction.v_search = False updateText = True print(f"Found {instruction.word}") #screen.fill(BLACK, textAreaRect) text = fontLg.render(f'Found {instruction.word}!', True, WHITE, BLACK) textRect = text.get_rect(center=(0.5*dispW, 0.75*dispH)) screen.fill(BLACK, textRect.inflate(240,0)) screen.blit(text,textRect) pygame.display.update(textRect) counter = int(time.time() - timerStart) if prevCount != counter: prevCount = counter draw_counter(counter) else: tw.drive("stop") findFaceInit = True prevCount = 0 instruction.v_search = False if instruction.v_tricks: if instruction.word == 'party': if updateText: imgCount += 1 #screen.fill(BLACK, textAreaRect) text = fontLg.render('Party Time!', True, WHITE, BLACK) textRect = text.get_rect(center=(0.5*dispW, 0.75*dispH)) screen.fill(BLACK, textRect.inflate(240,0)) screen.blit(text,textRect) pygame.display.update(textRect) _,_,img = identify_faces(None, img, mode = "party_time") if time.time() < timerStart + 10: counter = int(time.time() - timerStart) if prevCount != counter: prevCount = counter draw_counter(counter) else: instruction.v_tricks = False prevCount = 0 party_over=True updateText = False if instruction.word == 'break dance': move_breakdance() #screen.fill(BLACK, textAreaRect) text = fontLg.render('Breakdancing!!!', True, WHITE, BLACK) textRect = text.get_rect(center=(0.5*dispW, 0.75*dispH)) screen.fill(BLACK, textRect.inflate(240,0)) screen.blit(text,textRect) pygame.display.update(textRect) if not updateText: if party_over: party_over=False cv2.imwrite('party_time/image_' + str(imgCount) +'.jpg',img) screen.fill(BLACK, textAreaRect) photo = cv2.resize(img,(120,73)) cv2.imwrite('tmp_photo.jpg',photo) photo = pygame.image.load('tmp_photo.jpg') screen.blit(photo,(0,247)) pygame.display.update(textAreaRect) #screen.fill(BLACK, textAreaRect) text = fontLg.render('Sparky is sitting waiting ...', True, WHITE, BLACK) textRect = text.get_rect(center=(0.5*dispW, 0.75*dispH)) screen.fill(BLACK, textRect.inflate(260,0)) screen.blit(text,textRect) pygame.display.update(textRect) # Aspect Ratios # 16/9 = 1280,720 -> 640,360 -> 320,180 -> 160,90 -> 240,135 # 4/3 = 960,720 -> 720,540 -> 240,180 resized=cv2.resize(img,(camWs,camHs)) # PiTFT Mode (240,180) # resized=cv2.resize(img,(360,270)) # Desktop Mode cv2.imwrite('tmp.jpg',resized) image=pygame.image.load('tmp.jpg') screen.blit(image,(0,0)) pygame.display.update(camRect) finally: if _picovoice is not None: _picovoice.delete() if audio_stream is not None: audio_stream.close() if pa is not None: pa.terminate() |
two_wheel.py
1 2 3 4 5 6 7 8 9 10 11 12 13 14 15 16 17 18 19 20 21 22 23 24 25 26 27 28 29 30 31 32 33 34 35 36 37 38 39 40 41 42 43 44 45 46 47 48 49 50 51 52 53 54 55 56 57 58 59 60 61 62 63 64 65 66 67 68 69 70 71 72 73 74 75 76 77 78 79 80 81 82 83 84 85 86 87 88 89 90 91 92 93 94 95 96 97 98 99 100 101 102 103 104 105 106 107 108 109 110 111 112 113 114 115 116 117 118 119 120 121 122 123 124 125 126 127 128 129 130 131 132 133 134 135 136 | # Two Wheel (Python 3) # Author: John Ly (jtl222), Carlos Gutierrez (cag334) # Date: December 17, 2020 # Purpose: Sets up two motors with the motor controller and uses piTFT buttons to control # motors for CW, CCW, and STOP # Includes inital setup parameters and functions only import RPi.GPIO as GPIO import time from collections import namedtuple from enum import Enum from recordtype import recordtype # set pin naming convention to the Broadcom (BCM) convention GPIO.setmode(GPIO.BCM) ######################## #-- BUTTON OPERATION --# ######################## # array corresponds to the available buttons on the piTFT by GPIO numbering piTFT_Buttons = [17, 22, 23, 27] # # on pin interrupt signal, handle motor functions # def GPIO_callback(channel): # for pin in piTFT_Buttons: # if (not GPIO.input(pin)): # print("falling edge detected on {}".format(pin)) # servo(buttonControls[pin][0],buttonControls[pin][1]) # # setup for all piTFT buttons as inputs using pull up resistors # print("setting up piTFT buttons") # for pin in piTFT_Buttons: # GPIO.setup(pin, GPIO.IN, pull_up_down=GPIO.PUD_UP) # print("GPIO {} setup".format(pin)) # GPIO.add_event_detect(pin, GPIO.FALLING, callback=GPIO_callback, bouncetime=300) ####################### #-- MOTOR OPERATION --# ####################### # Class for logging data Data = recordtype("Data", ['state','time']) # Motor Class containing information and setup for each new motor object class Motor: def __init__(self, In1, In2, PWM_pin): self.In1 = In1 self.In2 = In2 self.PWM_pin = PWM_pin freq = 50 # default motor response rate of 50 Hz print("Motor assigned to GPIO {}, {}, {}".format(In1,In2,PWM_pin)) for pin in self.pinList(): GPIO.setup(pin, GPIO.OUT) print("GPIO {} setup".format(pin)) self.PWM = GPIO.PWM(self.PWM_pin, freq) print("PWM instance started on GPIO {}".format(self.PWM_pin)) self.currState = MotorState.STOP self.history = [] def pinList(self): return [self.In1, self.In2, self.PWM_pin] # updates motor history of states, maintains length of history def updateHistory(self, Log: 'Data'): self.history.append(Log) if len(self.history) > 3: self.history.pop(0) # Motor States: STOP, CW, CCW, BRAKE # controls logic level for motor control input pins class MotorState(namedtuple('MotorState', 'In1 In2'), Enum): STOP = (0,0) CW = (1,0) CCW = (0,1) BRAKE = (1,1) def __str__(self) -> str: return self.name # create and setup Motor objects motorA = Motor(4,5,26) motorB = Motor(20,21,16) motorTuple = (motorA,motorB) # Dictates motor state and adjusts motor control pins accordingly # Parameters: # motor: Motor to be controlled | motorA(left) or motorB(right) # direction: spin state of motor | MotorState. STOP, CW, CCW, BRAKE # additional option "REVERSE" to toggle between CW and CCW def servo(motor: 'Motor', direction: 'MotorState', duty: "int" = 75): motor.currState = direction # update state in motor class motor.PWM.ChangeDutyCycle(duty) GPIO.output(motor.In1, direction[0]) GPIO.output(motor.In2, direction[1]) motor.updateHistory(Data(str(motor.currState),str(int(time.time()-startTime)))) print("{}: {}".format(motor,motor.currState.name)) # test sequence to test motor operation def drive(direction: 'string', speedL: "int" =75, speedR: "int" =75): # Stop by default # servo(motorA, MotorState.STOP) # servo(motorB, MotorState.STOP) if direction is "forward": servo(motorA, MotorState.CCW, speedL) servo(motorB, MotorState.CW, speedR) elif direction is "backward": servo(motorA, MotorState.CW, speedL) servo(motorB, MotorState.CCW, speedR) elif direction is "left": servo(motorA, MotorState.CW, speedL) servo(motorB, MotorState.CW, speedR) elif direction is "right": servo(motorA, MotorState.CCW, speedL) servo(motorB, MotorState.CCW, speedR) else: servo(motorA, MotorState.STOP) servo(motorB, MotorState.STOP) ################## #-- CODE START --# ################## startTime = time.time() # initialize servo state to stop servo(motorA, MotorState.STOP) servo(motorB, MotorState.STOP) # create PWM objects for speed control and initialize duty ratio duty = 75 motorA.PWM.start(duty) motorB.PWM.start(duty) |
headshots_picam.py
1 2 3 4 5 6 7 8 9 10 11 12 13 14 15 16 17 18 19 20 21 22 23 24 25 26 27 28 29 30 31 32 33 34 35 36 37 38 | # Borrowed from https://github.com/carolinedunn/facial_recognition import cv2 from picamera import PiCamera from picamera.array import PiRGBArray name = 'John' #replace with your name cam = PiCamera() cam.resolution = (512, 304) cam.framerate = 10 rawCapture = PiRGBArray(cam, size=(512, 304)) img_counter = 0 while True: for frame in cam.capture_continuous(rawCapture, format="bgr", use_video_port=True): image = frame.array image = cv2.flip(image,-1) cv2.imshow("Press Space to take a photo", image) rawCapture.truncate(0) k = cv2.waitKey(1) rawCapture.truncate(0) if k%256 == 27: # ESC pressed break elif k%256 == 32: # SPACE pressed img_name = "dataset/"+ name +"/image_{}.jpg".format(img_counter) cv2.imwrite(img_name, image) print("{} written!".format(img_name)) img_counter += 1 if k%256 == 27: print("Escape hit, closing...") break cv2.destroyAllWindows() |
train_model.py
1 2 3 4 5 6 7 8 9 10 11 12 13 14 15 16 17 18 19 20 21 22 23 24 25 26 27 28 29 30 31 32 33 34 35 36 37 38 39 40 41 42 43 44 45 46 47 48 49 50 51 52 53 | # Borrowed from https://github.com/carolinedunn/facial_recognition #! /usr/bin/python # import the necessary packages from imutils import paths import face_recognition #import argparse import pickle import cv2 import os # our images are located in the dataset folder print("[INFO] start processing faces...") imagePaths = list(paths.list_images("dataset")) # initialize the list of known encodings and known names knownEncodings = [] knownNames = [] # loop over the image paths for (i, imagePath) in enumerate(imagePaths): # extract the person name from the image path print("[INFO] processing image {}/{}".format(i + 1, len(imagePaths))) name = imagePath.split(os.path.sep)[-2] # load the input image and convert it from RGB (OpenCV ordering) # to dlib ordering (RGB) image = cv2.imread(imagePath) rgb = cv2.cvtColor(image, cv2.COLOR_BGR2RGB) # detect the (x, y)-coordinates of the bounding boxes # corresponding to each face in the input image boxes = face_recognition.face_locations(rgb, model="hog") # compute the facial embedding for the face encodings = face_recognition.face_encodings(rgb, boxes) # loop over the encodings for encoding in encodings: # add each encoding + name to our set of known names and # encodings knownEncodings.append(encoding) knownNames.append(name) # dump the facial encodings + names to disk print("[INFO] serializing encodings...") data = {"encodings": knownEncodings, "names": knownNames} f = open("encodings.pickle", "wb") f.write(pickle.dumps(data)) f.close() |